Do Radiator Reflectors Work?
We always have turkey for Thanksgiving. I mean who doesn’t? My job wasn’t to cook it, though; it was to eat it.
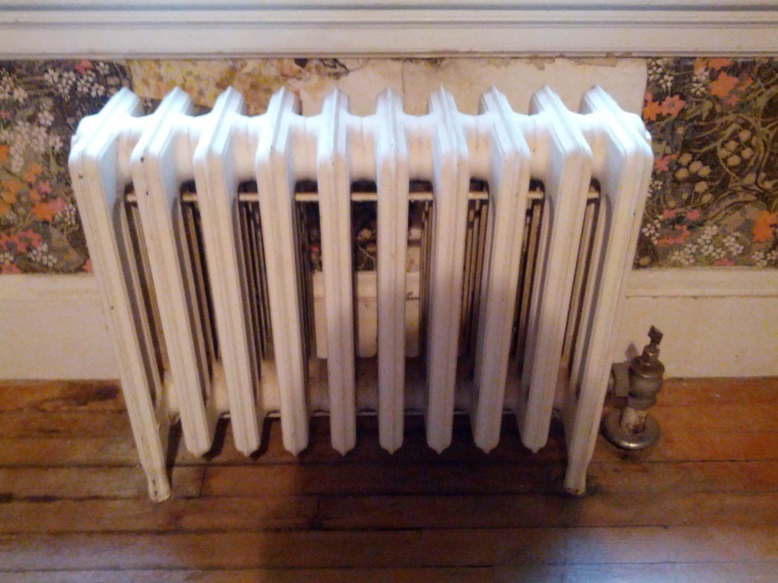
First things first. Before the 1920s, most steam contractors used cast-iron, column-type radiators. Those are the free-standing ones with the real wide sections. Column radiators were perfect for steam heating because they had a lot of internal space and they allowed the steam to rise up and displace the heavier air.
In the case of one-pipe steam, the air worked its way out of the radiator air vent. With two-pipe, the air escaped through the steam trap (or that old Vapor gizmo) and left the system through a vent somewhere down the main. Having a radiator with lots of internal space also allowed room for the condensate to get out of the way of the steam.
The trouble with those old column radiators, though, is that their makers never intended for them to be used with hot water. 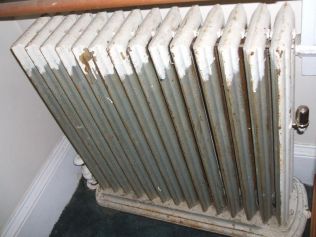 Those individual radiator sections aren't connected across the top, and that presents a challenge with water. You have to look real close to notice this on those old radiators, and it's the very first thing you should look for when you're considering a conversion from steam to hot water. If you don't see those top push nipples, the conversion isn't going to be very easy - or practical. Water won't flow well through a sectional radiator that's not connected across the top. To make it work, you'd have to drill and tap each section and install some sort of air vent all the way across the top. Or, if you have a LOT of patience, you can wait for the system water to absorb the air and move it to the air separator. This could take months.
Oh, and here's what your gorgeous radiator might look like after you're done putting screws into it to vent the air. 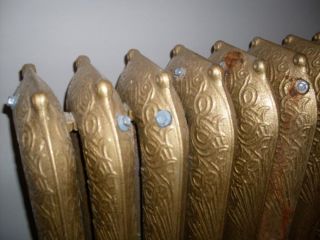
After the 1920s, steamfitters began using cast-iron, tube-type radiators (the ones with the thin sections). These were actually hot water radiators, but they also worked well on steam systems. Building owners preferred them because they were nicer to look at. Tube-type radiators do have push nipples across the top of the sections, so if that's what you have, you can move on to the next step.
And that next step is to check to see if your system is one-pipe steam or two-pipe steam. This may seem like an easy thing to do, but don't go by just one or two radiators. Many systems have a combination of both one- and two-pipe radiators, and that's perfectly normal - for steam. Look it over. While it's possible to convert a one-pipe radiator to hot water, it's sometimes not practical. You have to run a second pipe from the top of each radiator back to the boiler. Some folks use radiant-floor tubing to do this. They drill and tap the top of the radiator section that's opposite the supply valve and then run either PEX tubing or rubber hose back to the boiler, connecting it to the mains with cable ties as they go. Once back in the boiler room, they use manifolds with individual circuit-balancing valves to make their return connection to the boiler. Most plumbing & heating supply houses sell this gear nowadays.
Another option if you have one-pipe steam is to look into this unique valve from Danfoss.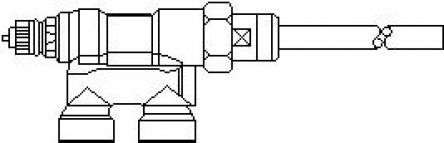 It works best with radiators that have push nipples across both the bottom and the top of the sections. You'll still need to run that second pipe (perhaps with PEX tubing?) but you'll just need one connection at each radiator, and you'll have the advantage of that thermostatic radiator valve.
A conversion from two-pipe steam to hot water is usually easier to do, but examine the system carefully before you make a decision. Many of the older two-pipe systems were Vapor systems. There may be orifices in either the supply valves or the return elbows. Those radiator return elbows may also have tiny check valves or stainless-steel balls that can mess up the flow if you don't know they're there. Look the job over carefully and if you have any doubts, go to the Wall and ask for help here.
Before you break out the tools, do a complete and accurate heat loss calculation on the entire building. Don't settle for one of those cockamamie rules of thumb that has you measuring the cube of the building and multiplying by an arbitrary number. Rule-of-thumb methods will oversize your system by a ridiculous amount. Take the time to do it right. If you don't know how to do a heat-loss calculation, check with someone who does know.
Once you get an accurate heat loss calculation, measure the existing radiation for square footage of Equivalent Direct Radiation (EDR). You're trying to find out if the radiation that's already in the building will be able to heat the place once the relatively cooler hot water is flowing through it.
Keep in mind that one-psi steam in a radiator will bring the surface of that radiator up to 215 degrees. Hot water, by comparison, is usually only about 180 degrees, tops. A square foot of steam EDR will put out 240 Btuh. Convert that radiator to hot water and you're only going to get about 150 Btuh out of that same square foot of radiation. So, for instance, if you have a five-tube, 26" high, 10-section, cast-iron radiator running on steam, it will emit 8,400 Btuh. Convert the system to 180- degree hot water and you'll get only 5,250 Btuh out of that radiator. If you're looking for a fast way to figure out how much EDR is in a radiator, get a copy of my book, The Golden Rules of Hydronic Heating.
Once you've gone through that exercise, ask yourself if this lesser output from the radiators will be enough to heat each room on the coldest day of the year. This depends on the heat loss, and that's why you have to take the time to do both an accurate heat loss calculation AND a survey of the existing radiation.
If, after you've done your homework, you find the existing radiation can carry the heat loss on the coldest day of the year, you can move on to the next step.
Check the system for leaks. Keep in mind a steam system is used to seeing only about two-psi steam pressure. If there are leaks anywhere, you might not have noticed them at such a low pressure. This is especially true if the leaks are in the return lines. But when you fill the system with water the static pressure is going to be a lot higher. You'll notice those leaks for sure! It's so much better to find them before the conversion, if you can.
A two-story hot water system will have at least 12-psi static pressure on it. A three-story building will have 18-psi pressure, and so on. Add in the pump's pressure along with the pressure of the expanding water as it heats and you can see the dramatic difference between steam and hot water.
So before you commit to the job, raise the steam pressure to about 10-psi pressure and walk through the entire system looking for leaks. If they're there, they should show up under the increased steam pressure. Once you see them, you'll have a better idea of what you're up against, and you'll be able to make the decision as to whether or not you should move on from here.
Next, if the system looks sound, you can take out the tools and go to work. You'll have to remove the innards from all the thermostatic radiator traps and float & thermostatic traps near the ends of the main (if you have them) so the water will be able to flow freely. Again, be especially aware of any old Vapor equipment.
There's a big difference in size between the supply and return lines in a steam system so balancing will always be a challenge when you're running on hot water. Leave the old radiator supply valves in place if they're working. You'll be able to use them for balancing the flow and the heat once you have the system up and running.
Most two-pipe steam systems are similar to two-pipe, direct-return hot water systems. The big difference is that, unlike a hot water system, the return line doesn't increase much in size as it returns to the boiler. With steam, the lines are picking up condensate, not the much greater flow of water you expect to see in a hot water system. Because of this, you may have to redo the return lines to accommodate the greater flow you'll be seeing once you've converted the system. Are you beginning to see why I prefer to fix old steam systems rather than convert them to hot water?
The good news, however, is that each two-pipe radiator will have a return that's at least 1/2" in size. A 1/2" line can safely carry 1-1/2 gpm of hot water and that translates to about 15,000 BTUH, which is usually more than the typical radiator will need to put out to heat the average room.
If you're going to keep the old boiler, you'll have to change the trim, getting rid of the gauge glass, the low-water cutoff, pressuretrol and near-boiler piping. If you're replacing the boiler, you'll still be getting rid of the existing near-boiler piping and setting the boiler up as you normally would with a hot water system. If you're not sure how to do this, get a copy of Pumping Away, which you can find in our store.
Size your circulator based on your heat loss calculation, not on the existing radiation. Take your gross BTUH load and divide by 10,000 to get the GPM for the pump. To figure pump head, measure the longest piping run, from the boiler to the furthest radiator and back. Allow six feet of pump head for each 100 feet of piping in that longest run. That's a rule of thumb, but it works well.
Use a good air separator. Every hot water system needs a good air separator.
Sizing the compression tank is tricky because there's going to be so much more water in those old steam pipes than you'd expect to find in a hot water system of the same BTUH rating. This is important because you base the size of the compression tank on the system's total water volume. Figure out how much water you have in the system, and then talk with the folks who sell the compression tanks. Don't depend on their quick-sizing charts in this case. They base those charts on standard hot water systems, not steam conversions.
You'll have to get a count on how many feet of each size pipe you have in the system to estimate the total water volume. Here's a chart that will help you figure out how much water you can expect to find in each foot of pipe:
Pipe Size Gallons in each linear foot
1/2" .016
3/4" .028
1" .045
1-1/4" .078
1-1/2" .106
2" .17
2-1/2" .25
3" .38
4" .66
5" 1.04
6" 1.5
If you've gotten this far, the next question will be, How do I control this hybrid I just created? The best way I know is to run the system on continuous circulator with an outdoor-air reset controller. It costs a bit more to set it up this way, but it is by far the best way I know to operate any hot water system, be it old or new.
When you're finished and everything seems to be working well, graciously accept all compliments on your piping skills, engineering abilities - and general good luck!
We always have turkey for Thanksgiving. I mean who doesn’t? My job wasn’t to cook it, though; it was to eat it.
I had written a story for Plumbing & Mechanical a while back about a fella in Canada who sent me this email: "Our problem is that five out of hundreds of univentilator co...

I love all the advances taking place in the world of hydronics, but I’m still seeing plenty of steam systems out there in our older cities, so knowing about dry steam wil...