
Dear Reader
Hello, old friend. I’m writing today to say thanks, and to say farewell. This will be my last column.

Here’s a list of things that a handy person (that you?) can do for himself or herself.
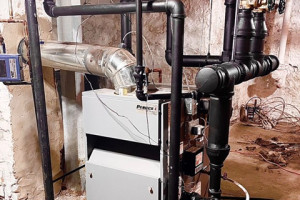
Flush the low-water cutoff: If you have a low-water cutoff with a float (see above) make sure you flush it once a week during the heating season. Do this by opening the valve at the bottom of the float chamber, and do it while the burner is running. You only need to flush about a quart of water from the thing so don’t overdue it. You want to make sure that any sediment that might interfere with the float doesn’t accumulate inside the float chamber. If you’re diligent about this, flushing a quart a week during the heating season, you’ll add years to the life of your boiler by protecting it from dry-firing (flame in the boiler, but not enough water). You might also save your life.
And here’s a tip for you. When you’re done flushing, close the valve quickly and watch the gauge glass. The water, which will leave the glass during the flushing, should bounce right back into the glass when you shut that valve. It should come up quickly, which indicates that the lower pipe that connects the low-water cutoff to the boiler is free of debris. If the water trickles back into the gauge glass, call a pro and have that pipe replaced. It’s dangerous.
Lower the steam pressure: The pressure on most residential steam boilers is much too high and that wastes fuel and can cause system problems. Look for your pressuretrol (there are pictures of the most popular ones further back in the book). Remove the cover and look inside. You’ll probably see a small plastic dial that’s marked DIFF (for Differential). Turn this to its lowest setting. Now, look on top of the pressuretrol where you’ll find a screw. Turn this and watch the slide gauge on the front of the unit. The screw moves the slide up and down. Turn the screw so that the slide goes down. Bottom it out and you’ll be at the right cut-in and cut-out pressures for your house.
And if your house won’t heat at that pressure, it’s not because of the pressuretrol; there’s something else wrong with the system – probably trapped air from missing or failed air vents, or the lack of insulation on the pipes.
If you have a pressuretrol that reads, “Differential is Subtractive” then set the MAIN scale indicator to 1-1/2 psi and the DIFFERENTIAL scale to 1 psi. That will allow your system to operate between ½ psi and 2 psi, which is the most any house need.
Insulate the pipes: Tuck them in and the steam will go further. I’ve talked a lot about this already and I hope I’ve convinced you of the importance of pipe insulation. Steam is a gas that wants to be a liquid. Don’t help it by having naked pipes. If you do, you’ll have less heat where it counts – upstairs.
If you have asbestos on your steam pipes now, and it’s in good shape, you can wrap it with plastic. If you’re thinking about having it removed, please don’t do this yourself. Get a qualified asbestos abatement company to do the work for you. Your future health is worth far more that what you’ll pay those folks.
If the pipes are bare, cover them with insulation. Use fiberglass insulation, not the rubber type that you’ll find in home centers. There are companies that make shaped pipe insulation that opens like a clamshell. It comes in various sizes and you’ll have more luck finding this at a good plumbing-and-heating supply house than you will at a home center. You’ll have to know the size of the pipe when you go there so measure the outside diameters of all the bare pipes that you’re going to insulate. The supply house will also have insulation for the elbows and tees throughout your system. If you’re not concerned with appearance, you don’t have to use these. You can cover the corner elbows and the tees with plain insulation (like you’d use inside your walls) and duct tape it all together. Not pretty, but it works.
For that matter, if you don’t care how it looks, you can cover all the pipes with plain insulation and duct tape. Your choice, but make sure they’re tucked-in.
Keep in mind, though, that in some buildings the pipe that goes from floor to floor just might be the radiator. This is especially true in apartment buildings where the only heat in the bathroom and the kitchen comes from that bare vertical riser. Don’t insulate these pipes unless you feel they’re overheating the rooms.
Check, and if necessary, change your air vents: Got radiator or convector vents? You can handle these. They just screw into the radiator. Clockwise tightens them; counterclockwise loosens them. Use a pliers, or your hand and do this only when the steam is off. Please.
Look the vent over and shake out any water that may be stuck inside of it. If it doesn’t gross you out, blow into the threaded part of the vent to see if the air comes out the other end. If it seems to be leaving very slowly, try cleaning the vent. You’ll do this by placing the vent in a pot of vinegar and bringing it to a boil on your stove. Hold your nose. The vinegar is a mild acid and it does a nice job of breaking down deposits that usually wind up in air vents.
Put a bit of Teflon tape around the threads of the vent and screw it back into the radiator. Make sure the vent hole points toward the ceiling.
Keep the steam pressure low (that’s the pressuretrol’s) job. See what happens.
If you’re still having the same problem, it’s time to buy some new air vents. You’ll find the best ones at plumbing-and-heating supply houses, and they’re not all the same. As with most things in life, you get what you pay for.
And the same goes for main vents. These can be pretty expensive. You can change them yourself if you have a big wrench. The same things that apply to radiator vents apply to main vents, but on a heftier scale. Chances are that what you’re taking out is from a company that’s out of business so take the vent to a good plumbing-and-heating supply house, show it to the counterman and ask him for a suitable replacement.
If you get stuck on any of this, stop by our website at www.HeatingHelp.com. We don’t sell vents, but if you post your question on the Wall (our bulletin board) and show us a photo, we should be able to tell you exactly what you’re dealing with, and what would be a good replacement for it.
Pitch a one-pipe steam radiator: If need be, you can do this, but be careful. Watch your back and don’t do it alone. Lift (or lever) the end opposite the supply valve and have your helper slip a piece of wood, metal or checkers under each of the two radiator’s feet (on the free end). If you’re older and wiser, you’ll be the one sliding the checkers. Let the young guys do the heavy lifting.
Repack the supply valves: If the stem around your radiator supply valve is leaking you can probably repack it. Go to the plumbing-and-heating supply house or to your local hardware store and get some graphite packing. Remove the valve’s handle and unscrew the packing nut. That’s the one on the valve stem. Wrap the graphite around the stem and screw the packing nut back down. Put it all back together and see how you did. Good luck!
And make sure the steam’s off when you’re doing this. Please.
If you have two-pipe steam and your radiator valve is leaking you may not be able to repack it. Many of those old systems ran into vacuum so that the homeowners could get the maximum amount of Btus out of their coal fires. Water boils at a lower temperature in a vacuum, and to keep the vacuum from breaking, the Dead Men used what they called packless valves. These had diaphragms to seal the valve stem. Once this type of valve starts to leak, it’s time to replace the whole thing, which is a job that’s best left to a pro because the new valve might not rough-in the same way as the old valve did, and it’s pretty easy to snap those old pipes if you don’t have the right tools and experience.
And one last thing you can do: Know when to keep your hands in your pockets. A steam system is like a child’s mobile. When you touch one part, everything else starts swaying. If you’re not sure what will happen when you touch something, don’t touch it. Get help.
Things you probably shouldn’t attempt
Repairing radiators: I’m putting this in this section mostly because it usually involves a lot of work and it will probably wind up breaking your heart in the end anyway. Here’s why.
I told you earlier about the difference between the screwed nipples and push nipples that connect the sections of old radiators. Recall? The oldest (and usually the prettiest) radiators had the screwed nipples with those left-hand/right-hand threads that pulled the sections together as the Dead Man turned the nipple with a special wrench. If you have those types of push nipples, trust me; they’re not available anywhere.
If you have push nipples, you’re in better shape (and so is your radiator). You can still get these. And you’ll know you have push nipples between those sections by the long tie rods that run through the radiator sections. If you see the tie rods, it’s possible to replace a busted radiator section, but only if you’re feeling real adventurous.
First you have to pry the thing apart. Take a long, loving look at that ancient radiator. Feeling lucky?
Let’s say you are. Once you get it apart (without cracking it), you’ll have to work the push nipple out of the section in which it’s still stuck and then call Oneida County Boiler Works in Upstate New York (Phone: 315- 732-7914). They’ll want you to send them the old nipple (regardless of its condition) and they’ll take good care of you. They regularly help people all across the country, and they assure me that Oneida is the only company around that still supplies these fittings. “If people could get ‘em any closer to home, they wouldn’t be calling us!” one of their guys told me. I believe him.
Once you get the new nipple you can lube it up and then try to get the whole thing back together again. This requires patience, a gentle touch, brute strength and a certain amount of Zen. And maybe some alcohol (for yourself). Work those tie rods and hope for the best.
Got a small leak? Try J-B Weld, which you can find in most home centers and hardware stores. But to fix the leak, you’ll first have to be able to get at it and prepare the surface. Before using the J-B Weld, you’ll have to fully drain the radiator and remove any paint, primer, or rust from its surface. Next, you’ll have to thoroughly clean the surface with a non-petroleum-based cleaner, such as acetone or lacquer thinner, removing all dirt, grease and oil. Then you’ll have to rough up the surface with a file, mix the two elements of the product in 50/50 proportions, and apply it to a thickness of no less than 1/32”. Don’t get any on your skin or in your eyes. Finally, let it dry for at least 15 hours, and see what you’ve got.
Can you do that?
The challenge, of course, is that an antique radiator can have more nooks and crannies than a Thomas’ English muffin, and a good leak knows where to hide. But if you’re in love with that old radiator, it’s certainly worth a try.
Give it a lot of thought, though. Old radiator repairs can break your heart.
Moving radiators: I don’t think you should do this because I’ve heard from so many homeowners who have tried. The speak of pain, and in some cases, of a potential new Winter Olympics event – Radiator Luging. This is where you ride a five-hundred pound radiator down a flight of stairs and through the living room wall. Go ahead; make a memory!
Professional heating contractors know how to disconnect old radiators without breaking the pipes. Those fittings are often rusted together and need to be heated (without burning down your house) or otherwise coaxed into letting go. Then there’s the massive weight to consider. Contractors use expensive, motorized hand trucks that climb stairs. It’s safer this way. Hire someone to do this work for you.
Move Piping: Don’t do it. Period. Those pipes in your basement that keep hitting you on the noggin are at that height for a reason. Steam pipes have to pitch so that the condensate can roll back to the boiler. They’re also a certain size and you should never alter this. If you do, the pressure drop across the system will change, the steam and the condensate will go to war, and you’ll wind up listening to the steam-heating equivalent of artillery fire. It’s called water hammer.
The risers that come up through your floors and connect to radiators can’t be angled off this way and that just because you’d like to put the new couch where the old radiator is. The steam and the condensate don’t care about your decorating ideas. Move those pipes and the steam and the condensate will get even with you.
If you hire someone to work in your house and they tell you it’s not a problem to raise pipes or reroute them around your living room, and that they can do the whole job in copper and raise everything up a foot or so, know that you are having a conversation with a world-class knucklehead.
Change steam traps: You might not want to tackle this either because so many steam traps are obsolete. Parts are available for most of these, but they come from companies that make kits. You have to know what you’re looking at to get the right kits. If you guess wrong, you’re out a bunch of money and you’ve still got the problem. Besides, pipes break. If you don’t have the right touch to know when you’ve put as much torque on an old steam trap as it can take you can be in deep trouble very quickly. A pro will feel it, back off, and try another approach.
An amateur will snap a pipe every time.
Pros know how to get these old traps apart, and how to either fix them, or replace them when they can’t be fixed. They also know that a bad steam trap can pass steam into a return line, making it appear that working traps are defective. When it comes to fixing traps, it pays to leave it to the pros. It really does.
Convert the entire system to hot water heat: So much to consider before doing this. Here's an article that will help you see what's involved It can be quite challenging, and having a knowledgeable pro tweak your steam system might give you better results and better payback on your investment in time and money.
Replace the boiler: The same goes for the boiler. Steam boilers need to be piped with steel pipe, not copper (or PVC. Please.). You need special equipment to cut and thread steel pipe. The near-boiler piping has to be perfect if the boiler is to work to its potential because, nowadays, near-boiler piping is a part of the boiler. The system needs to be thoroughly cleaned afterwards. It’s tough work, and depending on where you live, it may even be illegal to replace your own boiler.
Beyond that, there’s the safety of your family to consider. If the burner isn’t set up properly, if the connection to the chimney, and the chimney itself, isn’t just right, you could all die from carbon monoxide poisoning.
This is not a good place to save money. Please leave it to the pros.
Replace broken pipes: Why did that pipe break? Was it acid corrosion? Water hammer? A wacky thing called erosion-corrosion (caused by an over-active condensate pump)? Is the broken pipe buried under your cement floor? Got a jack hammer? Where will you start looking for the leak? Got an infrared heat detector?
Pipes break for many reasons, and when they do, someone has to figure out why it happened so that, hopefully, it won’t happen again. And that’s a job for a professional heating contractor. Worth every penny, those guys. Trust me.
Anything else that makes you stare at the ceiling at night: When in doubt, get help.
Hello, old friend. I’m writing today to say thanks, and to say farewell. This will be my last column.

My six-year-old grandboy, Brendan, was in the vestibule of the diner when the bubblegum machine caught his attention. It was one of those spiral models that appeared in t...
Subdural posed a question on The Wall at HeatingHelp.com in the Strictly Steam section, where some of the sharpest knives in the drawer post every day. The question was a...