Antifreeze and Heating Systems
In response to a person on the Wall who asked, "Can I add antifreeze to my heating system?" Brad White replies: Antifreeze is commonly done but like anything else, you ha...
Way back in 1978, I (Larry) installed my first solar water heating system. I continued with solar thermal, installing new domestic hot water (DHW), space, and pool heating systems until tax credits left in 1986; then kept nearly all the local systems up and running for many years after that. It became painfully obvious to me that simplicity is essential for the durability and longevity of any solar thermal system. Complex systems just die young. In the early 1990s, I got to know Steve and Holly Baer (who ran Zomeworks in New Mexico), who had been chasing “elegant simplicity” for years, and did a far better job than most at actually catching it! It’s defined as: “Graceful - characterized by beauty of movement, style, form, or execution.” Elegant simplicity is very difficult to get right, but is such a powerful thing when achieved, that I became an acolyte. Elegant simplicity as it relates to building, encourages one to understand and use the properties of materials and other natural forces to help accomplish your goals. Almost always it means less costly and more durable equipment.
Back then in the late 70’s/early 80’s, the Holy Grail of solar thermal was to come up with an effective DHW system that would cost only $1,000--which was never really done. It is interesting to note that what one could buy for one dollar in 1978 would now cost $4.05, making a $4000 system the Holy Grail now! These days, you expect to pay $8,000 to $10,000 for a solar domestic hot water system, installed. I have a friend, Martin Holladay, who wrote an article in March of 2012, titled “Solar Thermal is Dead.” He generated a lot of discussion with that article, including dissent, so he wrote another article in December of 2014, “Solar Thermal is Really, Really Dead.” Martin looked at solar thermal prices and compared them to using photovoltaics (PV) and a heat-pump water heater to do the same job. After doing the math, PV and a heat pump appeared to beat solar thermal for water heating. But, clearly, it depends on what your assumptions are! I’ll add that heat pumps are new enough that we don’t really know how long they will last. At this point there have already been some shake-ups in the heat pump industry along with some complaints of units not working as expected. Also, good PV extracts about 20% of sunlight’s energy, while efficient solar thermal gathers around 80%, and even the “inefficient” system described in this article gets about 60%. These are clearly reasons to continue to explore how to make solar thermal work. Roof space is one concern, with PV taking up more space than thermal for the same output. Another reason could be that the grid can act as a big battery for PV, but only if you’re hooked up to the grid and the metering rules in your area are not too onerous. For off grid folks, too much PV for your usage is of little to no benefit. Additionally, if the grid goes down, for most people this means any type of electric water heater will no longer work. There are work-arounds, but they add to cost and my nemesis, complexity.
Enter Zak Vetter. Zak asked me to help design and install a solar hot water system for him, but he had a set of goals I’d not heard before. He wanted:
Note that cost was not given as a limitation!
I had never worked with such a list. Many assumptions go into designing and building a traditional solar thermal system, and those got challenged by Zak’s goals. Here is a quick list of assumptions we typically work from:
Design rules also involve assumptions:
Clearly, Zak’s goals didn’t line up with the standard assumptions. But I’m glad he challenged convention, because ultimately we built a system that costs less and performs better than any other solar thermal system I know of. The system cost was right around $4,000 and provides for 90-95% of the yearly hot water need. A handy person could do the same job for around $3,000, if they built their own collectors, which basically means coiling poly tubing and putting it on a frame, with some sort of glazing.
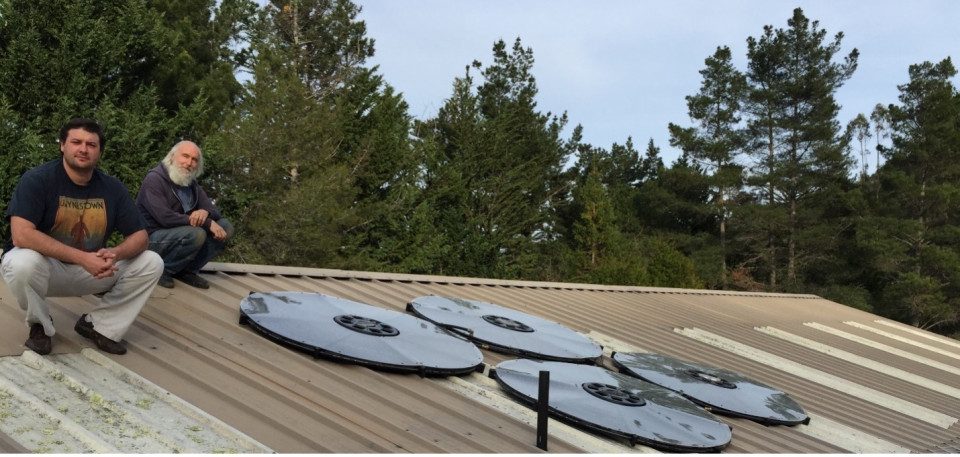
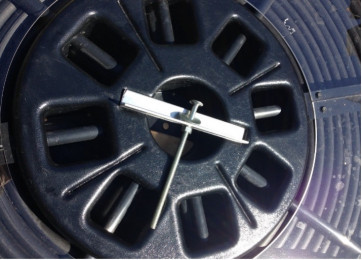
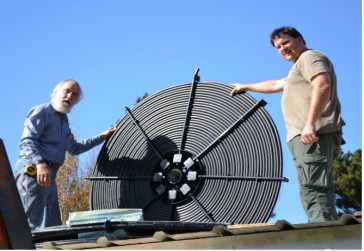
Following is the thinking that got us there. Wanting efficient collectors forces us to build more complex, expensive systems due to overheating and freeze concerns. It turns out that efficient collectors are better at losing heat to a clear night sky than inefficient collectors, so are more prone to freezing. So, instead, we used really inefficient collectors! These are simply coils of ¾” polyethylene tube, under an acrylic glazing. There is no insulation in the collectors, so they cannot easily overheat and are unlikely to be damaged by freezing, because the plastic tubing can expand somewhat. Also, we got to run the domestic water through the collectors directly, so a heat exchanger and other equipment were not needed. The hottest we’ve measured in summer with no water flow is 170 F in the collectors, and they have frozen multiple times without problem. This type of collector has been under test in San Jose, California, for over sixteen years with no trouble. Essentially, they are pool collectors, modified to produce domestic hot water, simply by adding an acrylic glazing. They are commercially made by Gull Industries in San Jose, CA. Here is what the coils look like installed on Zak’s roof.

Four coils of ¾” poly pipe, 300 feet each.
The coils are 26 square feet each. Another benefit of using “inefficient” collectors is that we eliminated the need for copper pipe to and from them, but instead were able to run PEX tubing. With traditional copper collectors that can stagnate in the summer sun at up to 400 degrees F, PEX tubing would melt pretty fast. But we were able to use poly pipe and PEX for nearly everything, simplifying the job even further. We purposely oversized the system, so it could coast through periods without sun and recover quickly when the sun returns. When overheating is no longer a concern, oversizing loses that drawback.
The tank was another consideration. Normally, with any glass-lined tank (nearly all tank-type water heaters in the US are glass-lined), you want to turn over the volume of the tank daily to prevent stagnation and odor problems. Turns out the anode that comes with all glass-lined tanks generates hydrogen gas, which some anaerobic bacteria really like. We got around this by installing a 105-gallon Marathon tank, by Rheem. This is a non-metallic tank that needs no anode, so does not “age” the water like glass-lined tanks do. The benefit of this much storage is the ability to survive happily through up to four sunless days. Here is what the tank looks like:
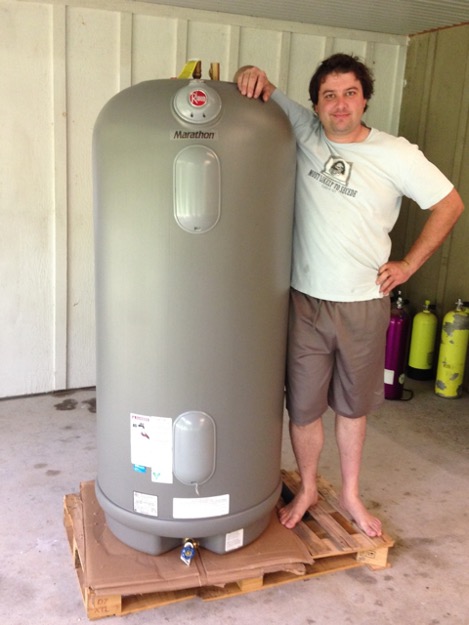
Zak Vetter, who is six foot, two inches tall, and the Marathon tank.
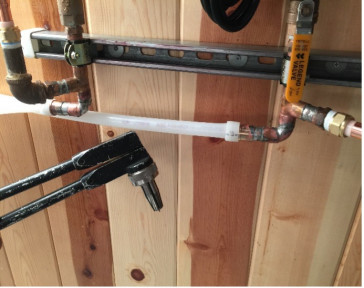
One other benefit of the Marathon tank is its insulation. It’s got three inches of foam, and the literature says it loses only five degrees F in 24 hours. Our data-logging suggests it’s more like six to eight degrees in our situation, but still, not bad. Insulation is something else we played with. Pipe insulation seldom comes really thick, yet keeping heat loss down increases the actual solar fraction and reduces the amount of back-up energy needed. So we decided to double up on the insulation where possible. Here are photos of how that worked:
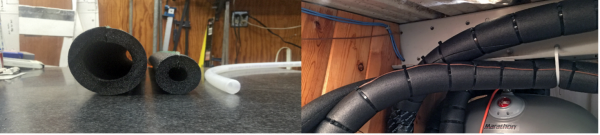
3/4” PEX pipe with two layers (1.5”) of insulation. Looks like big pipe when installed.
Solar water heaters are normally designed as one- or two-tank systems. One tank is better, if you can make it work, as there is less equipment to lose heat from. These days, this can only be readily done with electric backup. (In years past, gas fired solar tanks were made that had a burner mounted fairly high up in the tank so it didn’t compete to heat the same water that solar was trying to heat.) So another thing we did was to disconnect the lower element in our single tank and use only the upper element for backup. This prevents the electric heat source from competing with the solar one as long as the system is designed to prevent mixing of the tank. Thermal stratification is our friend! We wired the upper element at 120 volts rather than 240, so there was no need to do anything more than just plug it in. It does take four times as long to heat at half the voltage, but Zak wanted a good test of the solar--so he only plugged it in not quite two years ago. The system was installed in November of 2014. Three years later, in October of 2017, Zak plugged in the back-up heater element and over the winter It runs about half an hour daily on average, drawing 1100 watts. It’s set to 115 F.
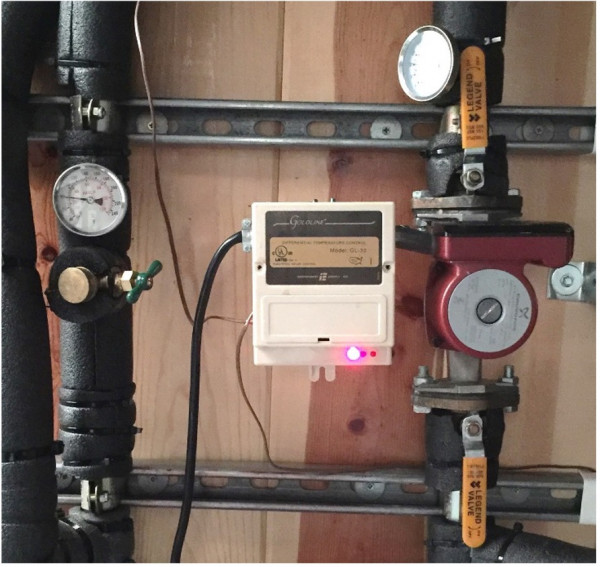
Solar control with pump and thermometers.
The system is managed simply with an off-the-shelf Goldline GL-30 solar controller. It measures the temperature at the solar collector and at the bottom of the tank. It compares the two and, when the collector is sufficiently hotter, turns on the pump, which moves about one gallon per minute through the roughly 1300 feet of ¾” tubing, with the collectors hooked up in series. The control has adjustments for fine-tuning this set-point. Fortunately, we do not need the control for freeze or overheating protection.
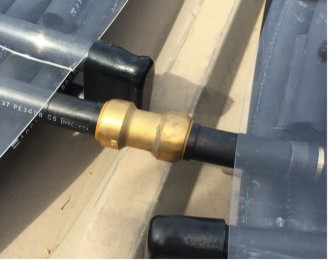
The system was simple to install. If you look at installation time, it took only six hours, which is very fast. In the good old days, a fast installation used to be three guys and one long day, or something like 24 person-hours. This system went in so quickly because:
We used PEX and polyethylene tubing.
Here are photos showing some of the time-saving hardware.
Performance so far has been good. We’ve data-logged at multiple points across the system in order to understand just how it’s working. Following is a graph of the Spring Equinox performance. You’ll see that the system produced water ranging from about 110F to a little over 140F.
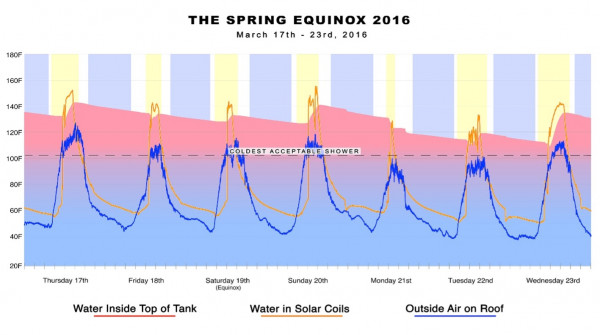
The term “solar fraction” is used to indicate what percentage of one’s hot water is heated by the sun. It is defined as “the amount of energy provided by the solar technology divided by the total energy required.” Done right, determining the solar fraction would involve measuring total hot water use and temperature rise, taking into account any parasitic loads, like pump, controller and also back-up heating. We opted instead to simply notice when the solar-heated water was hot enough to shower with. If the stored water is around 105F or more, it’s good for showering. When we say the system is producing 95% of the hot water, it means Zak gets acceptable shower temps 95% of the time. It’s a quick, non-mathematical way of understanding generally how the system is performing. If we took accurate measurements to determine solar fraction, it would probably be higher than 95%. But because we consider anything under 105 F inadequate, we’re presently not taking credit for water that isn’t quite hot enough, but is certainly well above groundwater temperature.
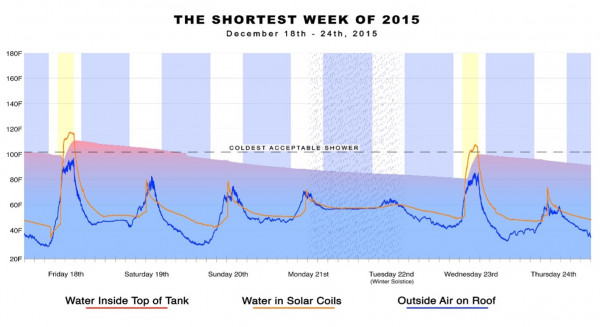
Following is a graph that show the system at its worst. The vertical yellow bars represent periods of sunshine, and the vertical blue bars are night time. Between the 21st and 22nd you’ll even see rain! But note how just a few hours of winter sun on the 23rd gives the tank about a 20-degree boost.
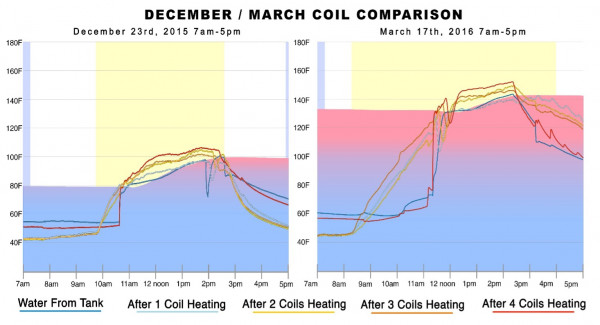
Another two graphs show the differences between December and March. Note that, in these graphs, we measured outputs from each collector to see if all four were useful. It turns out that the first two collectors gathered more BTUs, but the following two collectors each bumped the temp up higher, so they really did help--particularly during the colder times of the year.
Where to go from here? Clearly there will be limitations on where this sort of system can be successfully installed. If these collectors are covered with snow, they might not function too well, so it could make sense to avoid areas that stay below freezing for extended periods of time. Also, if tax credits are the main motivation, this system won’t do, as this collector/system isn’t yet SRCC-certified. Still, this system should cost less then most other systems, even without the benefit of tax credits.
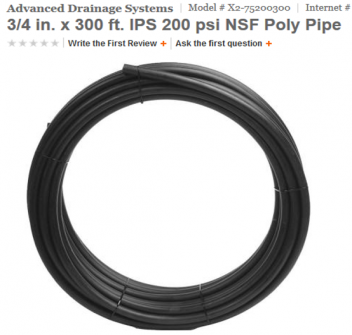
There is a way to make the system cost even less, by making one's own collectors. It turns out you can buy enough of the right type of poly pipe (NSF, 200 PSI) to make a coil for $194, cutting collector cost by around $300 each!
To wrap up, it’s clearly a good thing to bring fresh perspectives to solar water heating and set aside the forty year old ones. This solar design is a result of using “systems thinking”, understanding the properties of materials and employing elegant simplicity. By intelligently questioning old ideas and assumptions, and by using newer materials and hardware, Zak pushed us to do better than I had believed possible!
Larry Weingarten was raised on the Monterey Peninsula of California and has been self-employed most of his working life. He got his general contractor's license in 1982. Larry has written articles on water heating and energy for various trade journals; has taught about these topics for PG&E, California State Parks, Affordable Comfort, and others; and has recently helped create DVDs on these and related topics. In 2006, he finished building an off-grid home; designed to be very efficient, comfortable, and inexpensive, it was the 13th home to meet the "1000 Home Challenge," a competition for creating superefficient homes. He likes cats.
Zak Vetter was also raised on the Monterey coast. He has been self-employed for over ten years, repairing and teaching about computers. Since 2008, Zak has been learning about the wide-ranging world of energy-efficiency while improving his own property. The solar water system in this article was inspired by a visit to Larry’s off-grid house, which demonstrated how much was possible with solar power.
In response to a person on the Wall who asked, "Can I add antifreeze to my heating system?" Brad White replies: Antifreeze is commonly done but like anything else, you ha...

Q: What is the difference between solar thermal and solar photovoltaic (PV)? A: Solar thermal panels heat water. Photovoltaic panels convert sunlight to electricity.
Here is an interesting story for you. Jessica Baldwin told me about the reclamation of these old solar panels. Nothing stands in this woman's way.