Dead Men's Steam School Seminar
This all-technical, three-hour seminar will make you familiar with the many types of old steam heating systems and what goes wrong with them. Dan Holohan’s easy-to-follow...
The list of steam heating contractors who have installed a completely new steam heating system is not long. By complete, I mean boiler, piping, risers, valves and radiators.
We did this as part of a historic renovation in a home in Leesburg, Va., about 12 years ago. The 100-year-old home originally had steam heat but sat vacant for 10-plus years. When the current owners purchased and restored the home, they decided to put the system back the way it was – with steam heat.
None of the existing piping or valves could be re-used due to rust and corrosion. Only a few of the radiators were salvageable. So, we started from scratch and piped a complete steam heating system.
My good friends, Frank “Steamhead” Wilsey in Baltimore, and Mark Hunt and Matt “Mad Dog” Sweeney in New York, have all installed complete steam systems. So have Gerry Gill, and others I’ve heard of, as well. But, rest assured the list is a short one.
It is far easier to rip out an old, tired steam system and replace it with a heat pump or forced air, than it is to restore the steam system. Even a hot water system would be easier to install. It is hard enough to find a contractor who can work on existing steam systems, much less one who will build one from scratch.
We recently had the opportunity to build a complete steam heating system in a 1910 duplex in Washington, D.C. The home was originally heated by a one-pipe steam heating system with column-style cast iron radiators. Many hands had touched the system over the years, and many changes were made to the piping. When I surveyed the job last winter, the operation of the heating system was unreliable with severe water hammer, high fuel bills, and several radiators that did not heat at all.
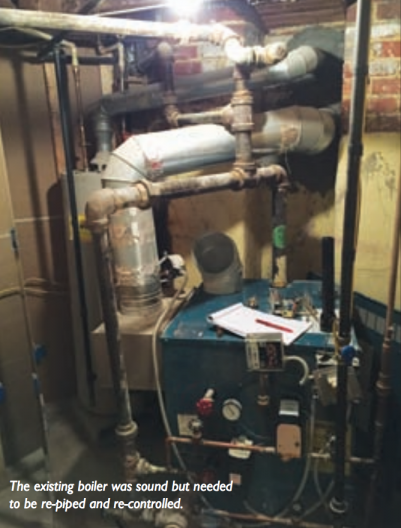
A Burnham Independence Atmospheric Draft Steam Boiler was installed about five years ago, but the near boiler piping was not to manufacturer specifications (see photo). The header was undersized and the counter-flow mains were not dripped. All of the start-up condensate flowed back into the header. A few minutes after steaming, the system would hammer horrendously and the furthest radiators would not heat at all. In an attempt to “force” the steam to these radiators, the pressure setting was raised to 4 psi. This just made the situation worse, as the condensate could not drain against the higher pressure in the undersized mains.
In addition, there were no main vents in the entire system. All of the air vented out of the radiator vents; very slowly. This caused the boiler to cycle on pressure and the radiators to heat unevenly. The closest radiators were hotter than a firecracker, while the furthest radiators remained stone cold. Because of the age of the house and settling, two of the runouts to the radiators were actually pitched the wrong direction causing condensate to puddle and hammer.
After surveying the system and sketching out a piping diagram, the primary deficiency was clear. There were only two 1-½-inch mains serving the entire system. Also, when the basement was finished, the pitch of both mains was changed to allow for more ceiling height. Condensate was backing up in the undersized mains creating severe water hammer and choking off the flow of steam to the radiators.
There was no fixing this system. The only solution was to cut everything out and start over. The radiators and some of the valves were able to be re-used. The boiler was very dirty and required a complete re-pipe, but was otherwise in sound condition. We did replace the relief valve, pressure-trol, LWCO and all operational controls including the gas valve, as it had operated for five years in under rough-duty conditions.
My lead techs, Brian Golden and Papa Duric, ran this job. The first thing they did was cut out and remove the near boiler piping, mains and risers. In order to access some of the piping, ceiling and walls needed to be opened. Brian explained to the client that this step was necessary to build a properly operating steam system.
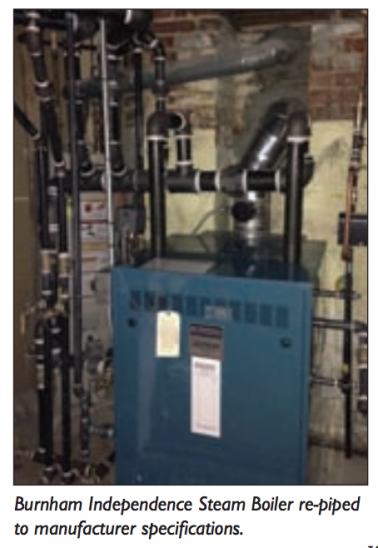
Next, Brian re-piped the near boiler piping to Burnham specifications (see photo). He piped two risers out of the boiler block to a drop header. He increased the header size from 2 inches to 3 inches. Both of these steps have the effect of drying out the steam, separating the condensate from the steam. He also increased the equalizer from 1-¼-inch to 1-½-inch to help stabilize the water line. A skim tapping was added to properly skim the boiler water line to remove dirt and oil.
The next step was to sketch out a piping diagram. Brian used a combination of “The Heating Helper,” published by Burnham, and “The Lost Art of Steam Heating,” by Dan Holohan. These two books contain all of the tables and charts required to properly size the mains, risers and radiator supply runouts.
Brian ended up with three new mains serving the system, two 2-inch and one 1-¼-inch. The undersized risers were re-piped with the proper size schedule 40 black steel pipe. The mains were pitched properly and securely mounted with new pipe hangers.
Main vents were added to the ends of the mains and all of the radiator vents were replaced with slow venting #40 radiator vents. This was the way the old-timer pipefitters did it; vent the mains quickly and vent the radiators slowly. This allows the steam to reach the radiators quickly and evenly, yet allows the radiators to heat slowly without hammering, knocking, gurgling or spitting condensate out of the vents.
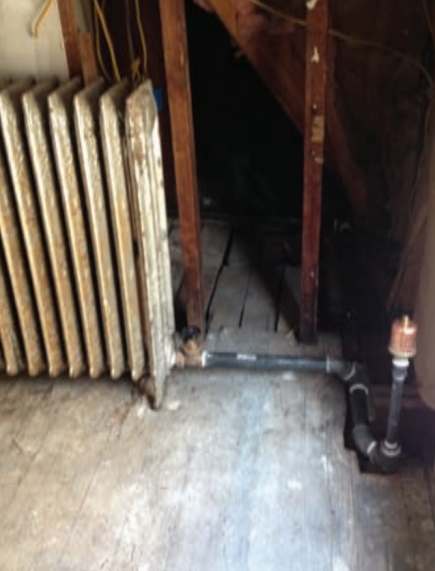
There was one riser than ran the furthest distance from the boiler that would not heat previously. Brian used an old trick and vented the top of the riser with a main vent (see photo). When the system was started, this riser now heated as quickly as the other risers and the previously cold radiators on this tier were toasty warm.
One very important detail. When Brian piped the three properly pitched mains back into the boiler room, he dripped them before connecting them to the header. These drips connect to the wet return below the boiler water line. The purpose of these drips is to allow start-up condensate to drain back into the wet return rather than into the header where it will condense the steam and hammer.
One other detail that Brian changed was to connect all three mains directly to the header rather than to tee off of a riser as previously piped. This allows the steam to flow evenly and equally through each main without the turbulence created by a bull-headed tee.
After the piping was completed and the broken radiator valves replaced, the next step was to clean the boiler. All of the new boiler piping has a coat of oil. Cutting oil, dirt and pipe dope get into the system. The boiler itself was filthy dirty. Dry steam cannot escape from the water line evenly if the boiler water is dirty.
Brian added a very small amount of Rhomar steam cleaner to the system and let it steam for a couple of hours. The oil and dirt washed back to the wet return where the dirty, oily water was wasted. Then, Brian skimmed the water line until the water ran cold. Both of these steps take time and must be figured into the job as a direct cost. Most likely, we will need to return a second time and repeat these steps after it has steamed for a few weeks in the fall.
After the boiler was cleaned, Brian added a little bit of Rhomar steam treatment which contains an oxygen scavenger and corrosion inhibitor. Easy does it when it comes to boiler chemicals. Only add a little or you will spend the rest of the day draining and skimming to clean the chemicals out.
When Brian was done, all radiators in the house heated quickly and evenly. There was no water hammer or knocking. A draft and combustion test was performed to document the combustion parameters and ensure that the chimney was drafting properly.
The last detail was to insulate the boiler piping, mains and risers. We typically do this, and I feel there is an art to making insulation look neat and professional. In this case, we had exhausted the client’s budget and they opted to do this work themselves.
The next time you run across an old, abused steam system, don’t rip it out. Instead, restore it to its former glory and walk away with the satisfaction of a job well done that has only been accomplished by a few select contractors. If you have built (or re-built) a complete steam system from the ground up, please share your story and pictures of the projects with me. I will add you to the list.
Dan Foley is president and owner of Foley Mechanical, Inc. based in Lorton, Virginia. (www.foleymechanical.com). FMI specializes in radiant, hydronic and steam systems as well as mechanical systems for large custom homes.
This all-technical, three-hour seminar will make you familiar with the many types of old steam heating systems and what goes wrong with them. Dan Holohan’s easy-to-follow...
We always have turkey for Thanksgiving. I mean who doesn’t? My job wasn’t to cook it, though; it was to eat it.
I had written a story for Plumbing & Mechanical a while back about a fella in Canada who sent me this email: "Our problem is that five out of hundreds of univentilator co...